3.2. Data 
“May be stories are are just data without a soul” – Brené Brown
This section describes the operations to either upload the first set of data into the table, or merge additional data with the one already stored. This step may be done automatically before you work with a workflow. If this is the case, you may skip this section or revisit it when you need to manipulate the existing data.
The data operations are divided into the following categories:
- Upload
-
Load the first data set in an empty table.
- Merge
-
Combine the existing data with new data
- Run a Transformation
-
Execute an operation in the existing data and store the result as additional columns.
- Run a model
-
Use the existing data to predict additional values.
These operations are available after selecting a workflow for manipulation under the top menu option Table .
If the workflow table is empty, OnTask will request the parameters required to upload data from a given data source. On the other hand, if the workflow table already contains data, OnTask will request the parameters to perform a merge operation in which the existing data is combined with the data extracted from the given source.
3.2.1. Upload Data 
These operations are provided to upload the initial set of data into the workflow table using a variety of sources.
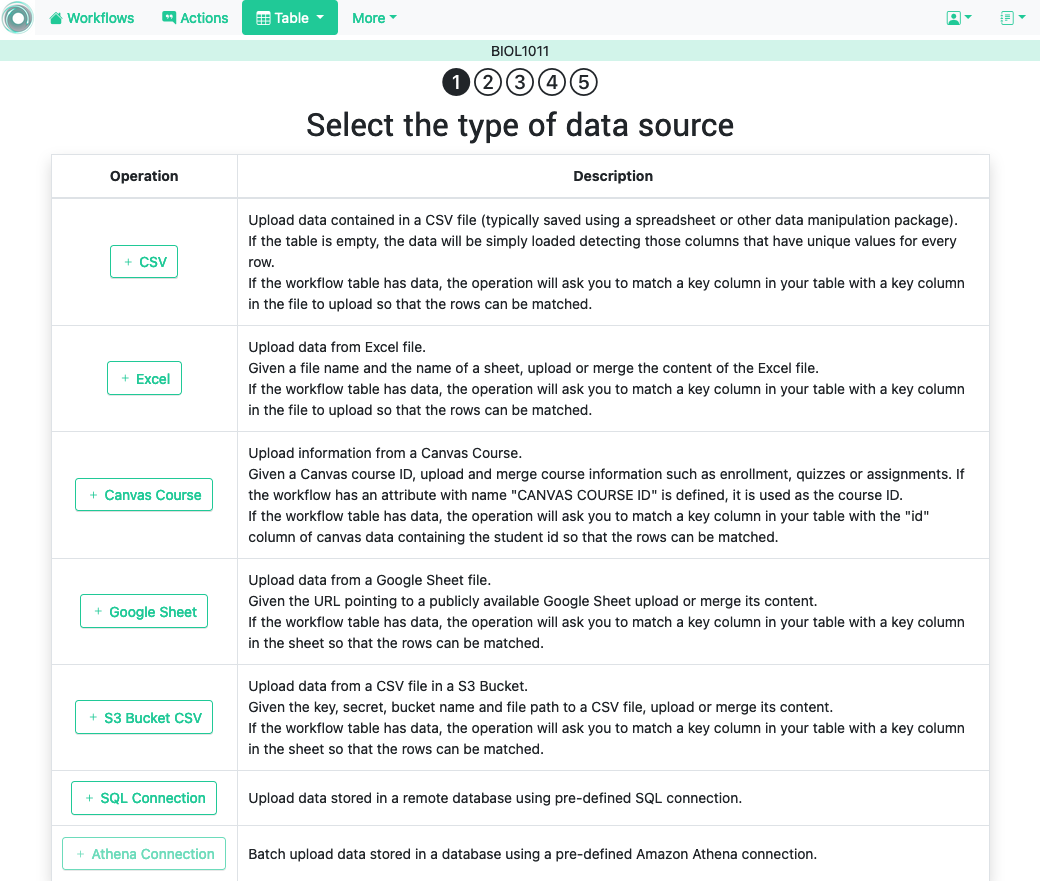
3.2.1.1. Upload CSV Files 
CSV or “comma separated value” files are plain text files in which the first line contains a comma-separated list of column names, and every subsequent line contains the values of these columns for each row. It is a popular format to exchange data that can be represented as a table (Microsoft Excel allows to save one sheet in a spreadsheet file into this format). The following figure shows the first step to perform this operation.
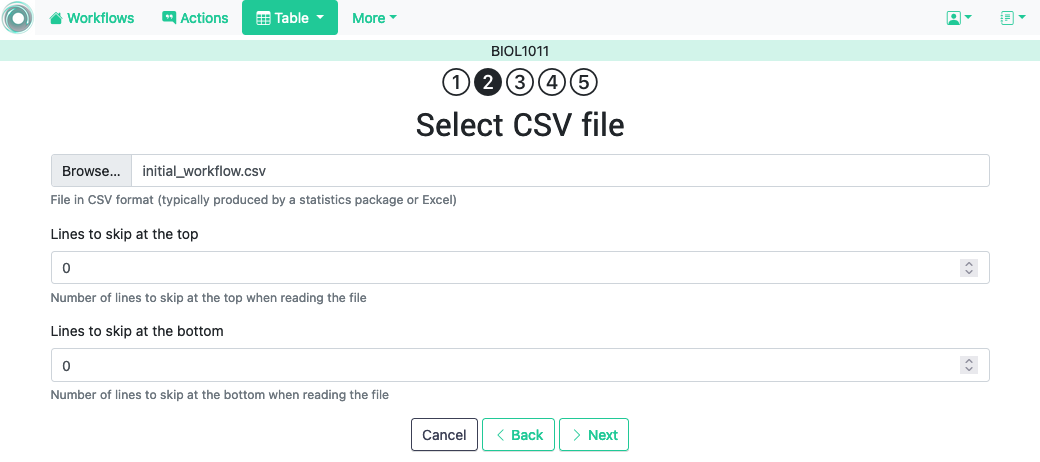
In some cases, the file with comma-separated values contains several lines at either the top or the bottom of that need to be skipped when processing the data. The page to upload the CSV file allows you to specify the number of lines to skip at the start and end of the file.
3.2.1.2. Upload Excel Files 
OnTask is also capable of uploading the data from one sheet of a Excel file. The following figure shows the first step to perform this operation.

In this case the file is assumed to have multiple Sheets and one of them has to be selected to upload the data.
3.2.1.3. Upload Canvas Course Data 
This option connects with a previously configured instance of Canvas Learning Management System and given a Course ID, it offers the possibility to uploads/merges several data sets such as the list of students enrolled in the course, the results from all the quizzes in the course, or the results from all assignments.
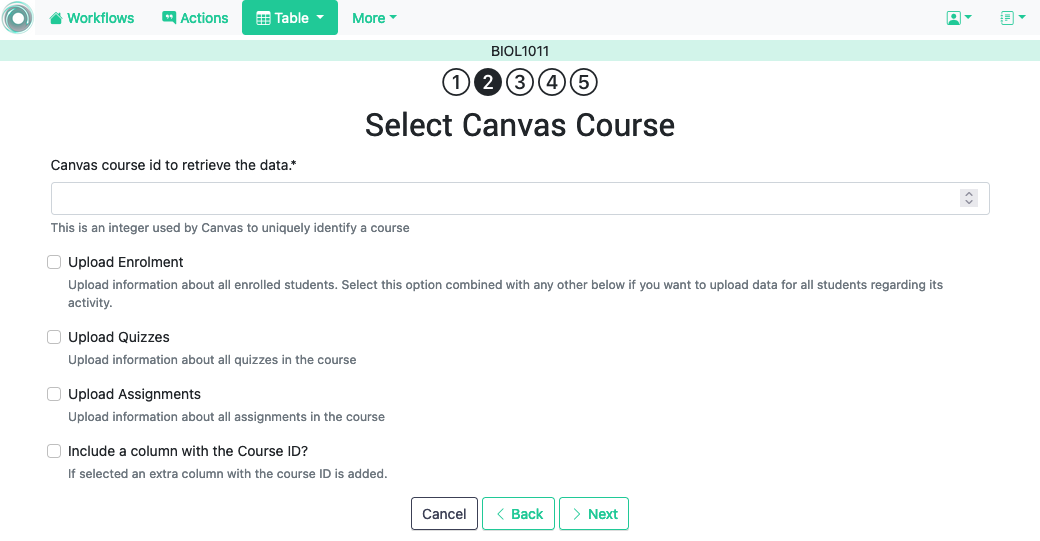
For convenience, if there is an attribute defined for the workflow with name``CANVAS COURSE ID`` and with an integer value it will be used by this operation as course id. This is useful when an OnTask Workflow corresponds to a course in Canvas throughout a long period of time.
This operation is particularly useful to populate the table with an initial set of rows (one per student enrolled) directly extracted from the remote platform. Additionally, it can be used at various points throughout a learning experience to update the list of students, upload quizz results, or upload assignment results. Combining these uploads with the right options when mering the new data sets provides a wide variety of possibilities to handle changes during a course delivery.
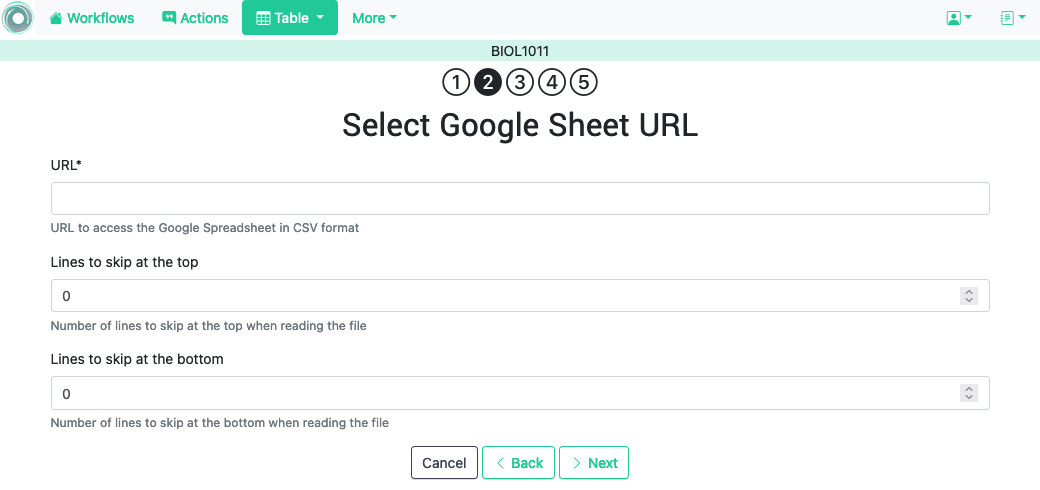
3.2.1.4. Upload Google Spreadsheet Files 
OnTask allows you to upload a data table stored in a Google Spreadsheet that is publicly accessible.
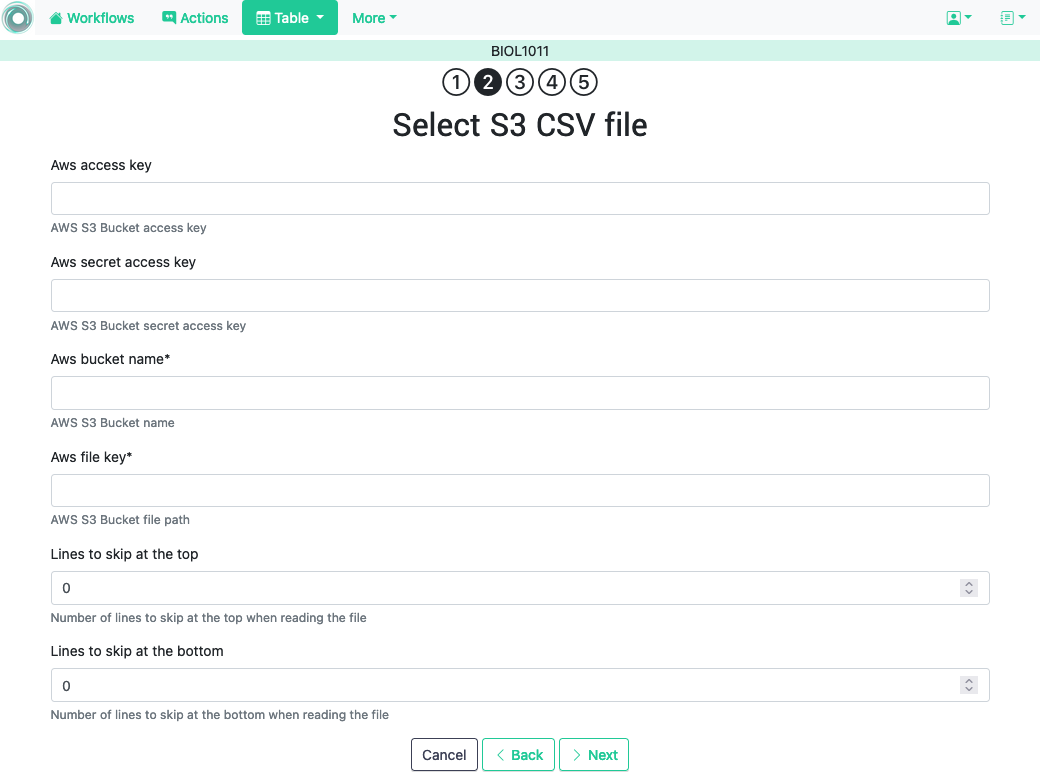
3.2.1.5. Upload a CSV file stored in Amazon S3 Bucket 
Amazon Simple Storage Service (S3) offers the possibility of storing files in buckets . The service offers an API to access these files. This page in OnTask requests the credentials required to access the CSV file stored in a bucket and process its content.
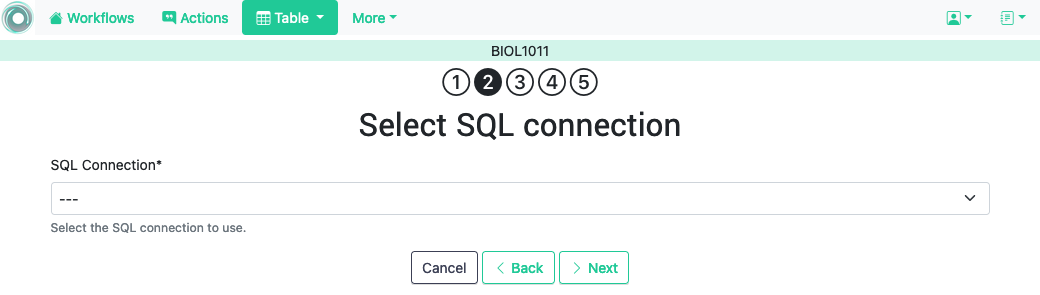
3.2.1.6. SQL connection 
This operation uploads the data into the current workflow table using a SQL connection to a remote database. These connections have to be previously defined and configured by the system administrator. Instructors can use them to access the content of a previously defined table in a remote database. Once selected, the platform shows the SQL connections available and a drop down menu to select the one to use.
3.2.1.7. Confirmation step to upload data 
When uploading data for the first time, the values are prepared to be assigned as the initial content of the workflow table. But before this assignment is done, the platform needs you to verify some information. Upon reading the new data, OnTask will automatically detect the data type in each column and those columns that have unique values (no repetitions) and mark them as keys . Key columns are very important because their values (as they are different for every row) are required for several operations. The workflow table must have at least one key column . If here are several columns with this property, OnTask allows you to unmark some of them as non-key as long as there is always one of them wih such mark. Additionally, you may mark any column as a key column if the values are all different. The operations to manipulate column information is described in the section Workflow Operations .
Before finishing the upload step and storing the data in the table, OnTask also allows you to change the name of the columns or change the Key attribute as shown in the following figure.
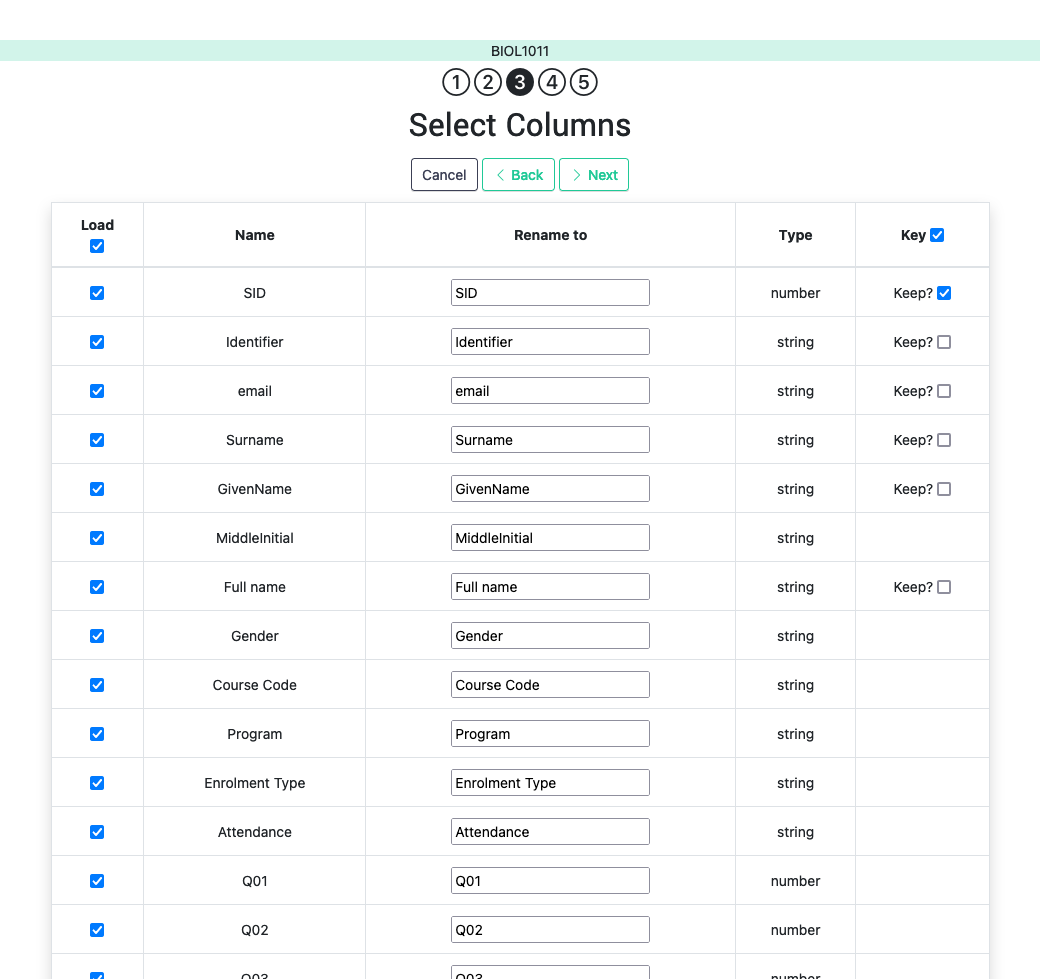
After this step the data is stored and the platform shows the Table page.
3.2.2. Data Merge 
Note
Merge a.k.a “Join”
Merging is a common operation in databases and is commonly known as join . There are several variants of join operations depending how the differences between the key columns are handled. These same variants exist in OnTask when combining the data already existing in the table. The operation relies on the key column to merge the two sources.
A merge operation is executed when data is uploading and the workflow already has data in its table . Although this operation is common in data science contexts, it has several variants that make it challenging to use properly. These variants derive mostly from the method used to specify how the values in the new columns are matched with respect to the ones already existing in the table. In other words, each new column has a set of values, but they need to be in the right order so that the information is matched appropriately for every row. For example, if the table contains a column with the age of the learners, and a new column with the gender is merged, the rows of the new column need to correspond with the learners in the existing table. The way to address this issue is to use a key column* in the existing table and another ** key column in the new data. These columns uniquely distinguish each row with a value so they are used to make sure that the information for the rows with matching values in these columns are merged. These operations are executed in a set of additional steps. The first step of the merge operation is identical to the upload operation. After detecting the column data types, the key columns and offering the option of changing their names, the next steps identify the key columns to use in the merge, the variant to merge, and shows a summary of the changes that will result from the operation.
3.2.2.1. Step four: select keys and merge option 
The following figure shows the third step of the merge operation.
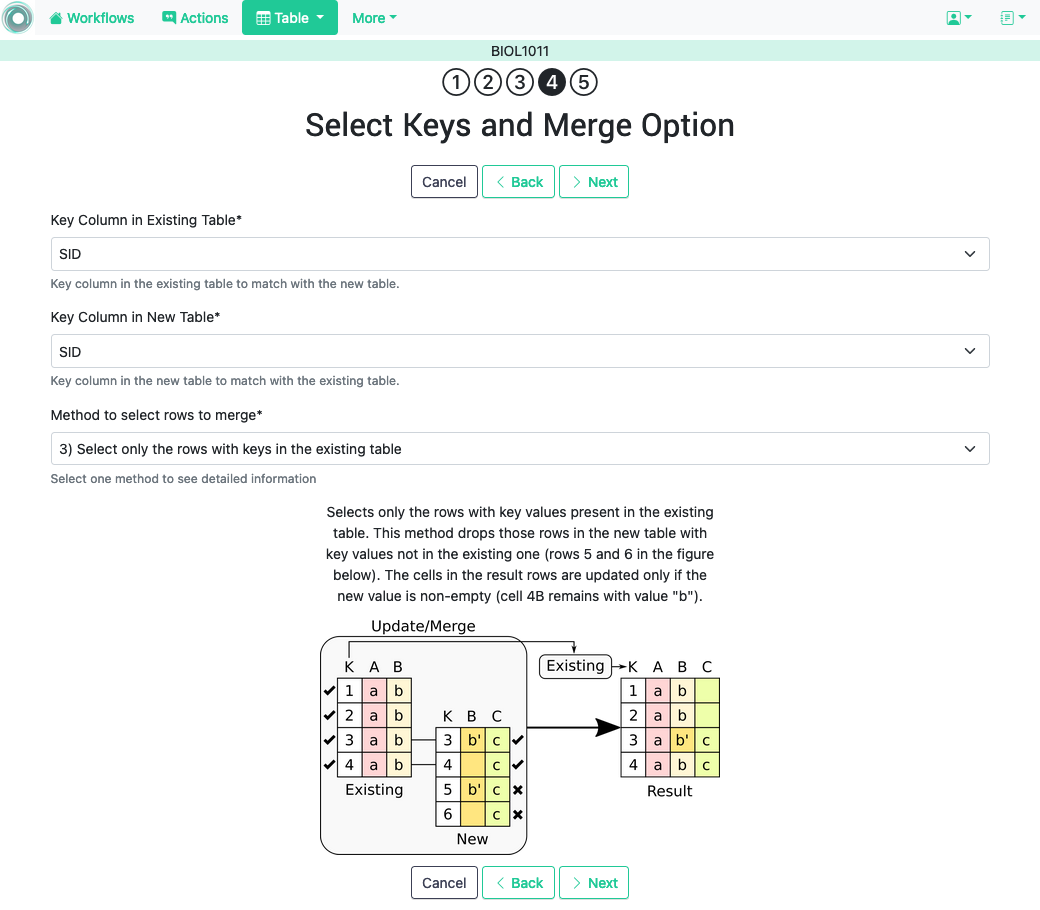
The form requires the following fields:
- Key columns
-
A key column in the external table about to be merged and a key column in the existing table (both fields are required).
- Merge method
-
After choosing a merge method, a figure and explanation are shown below.
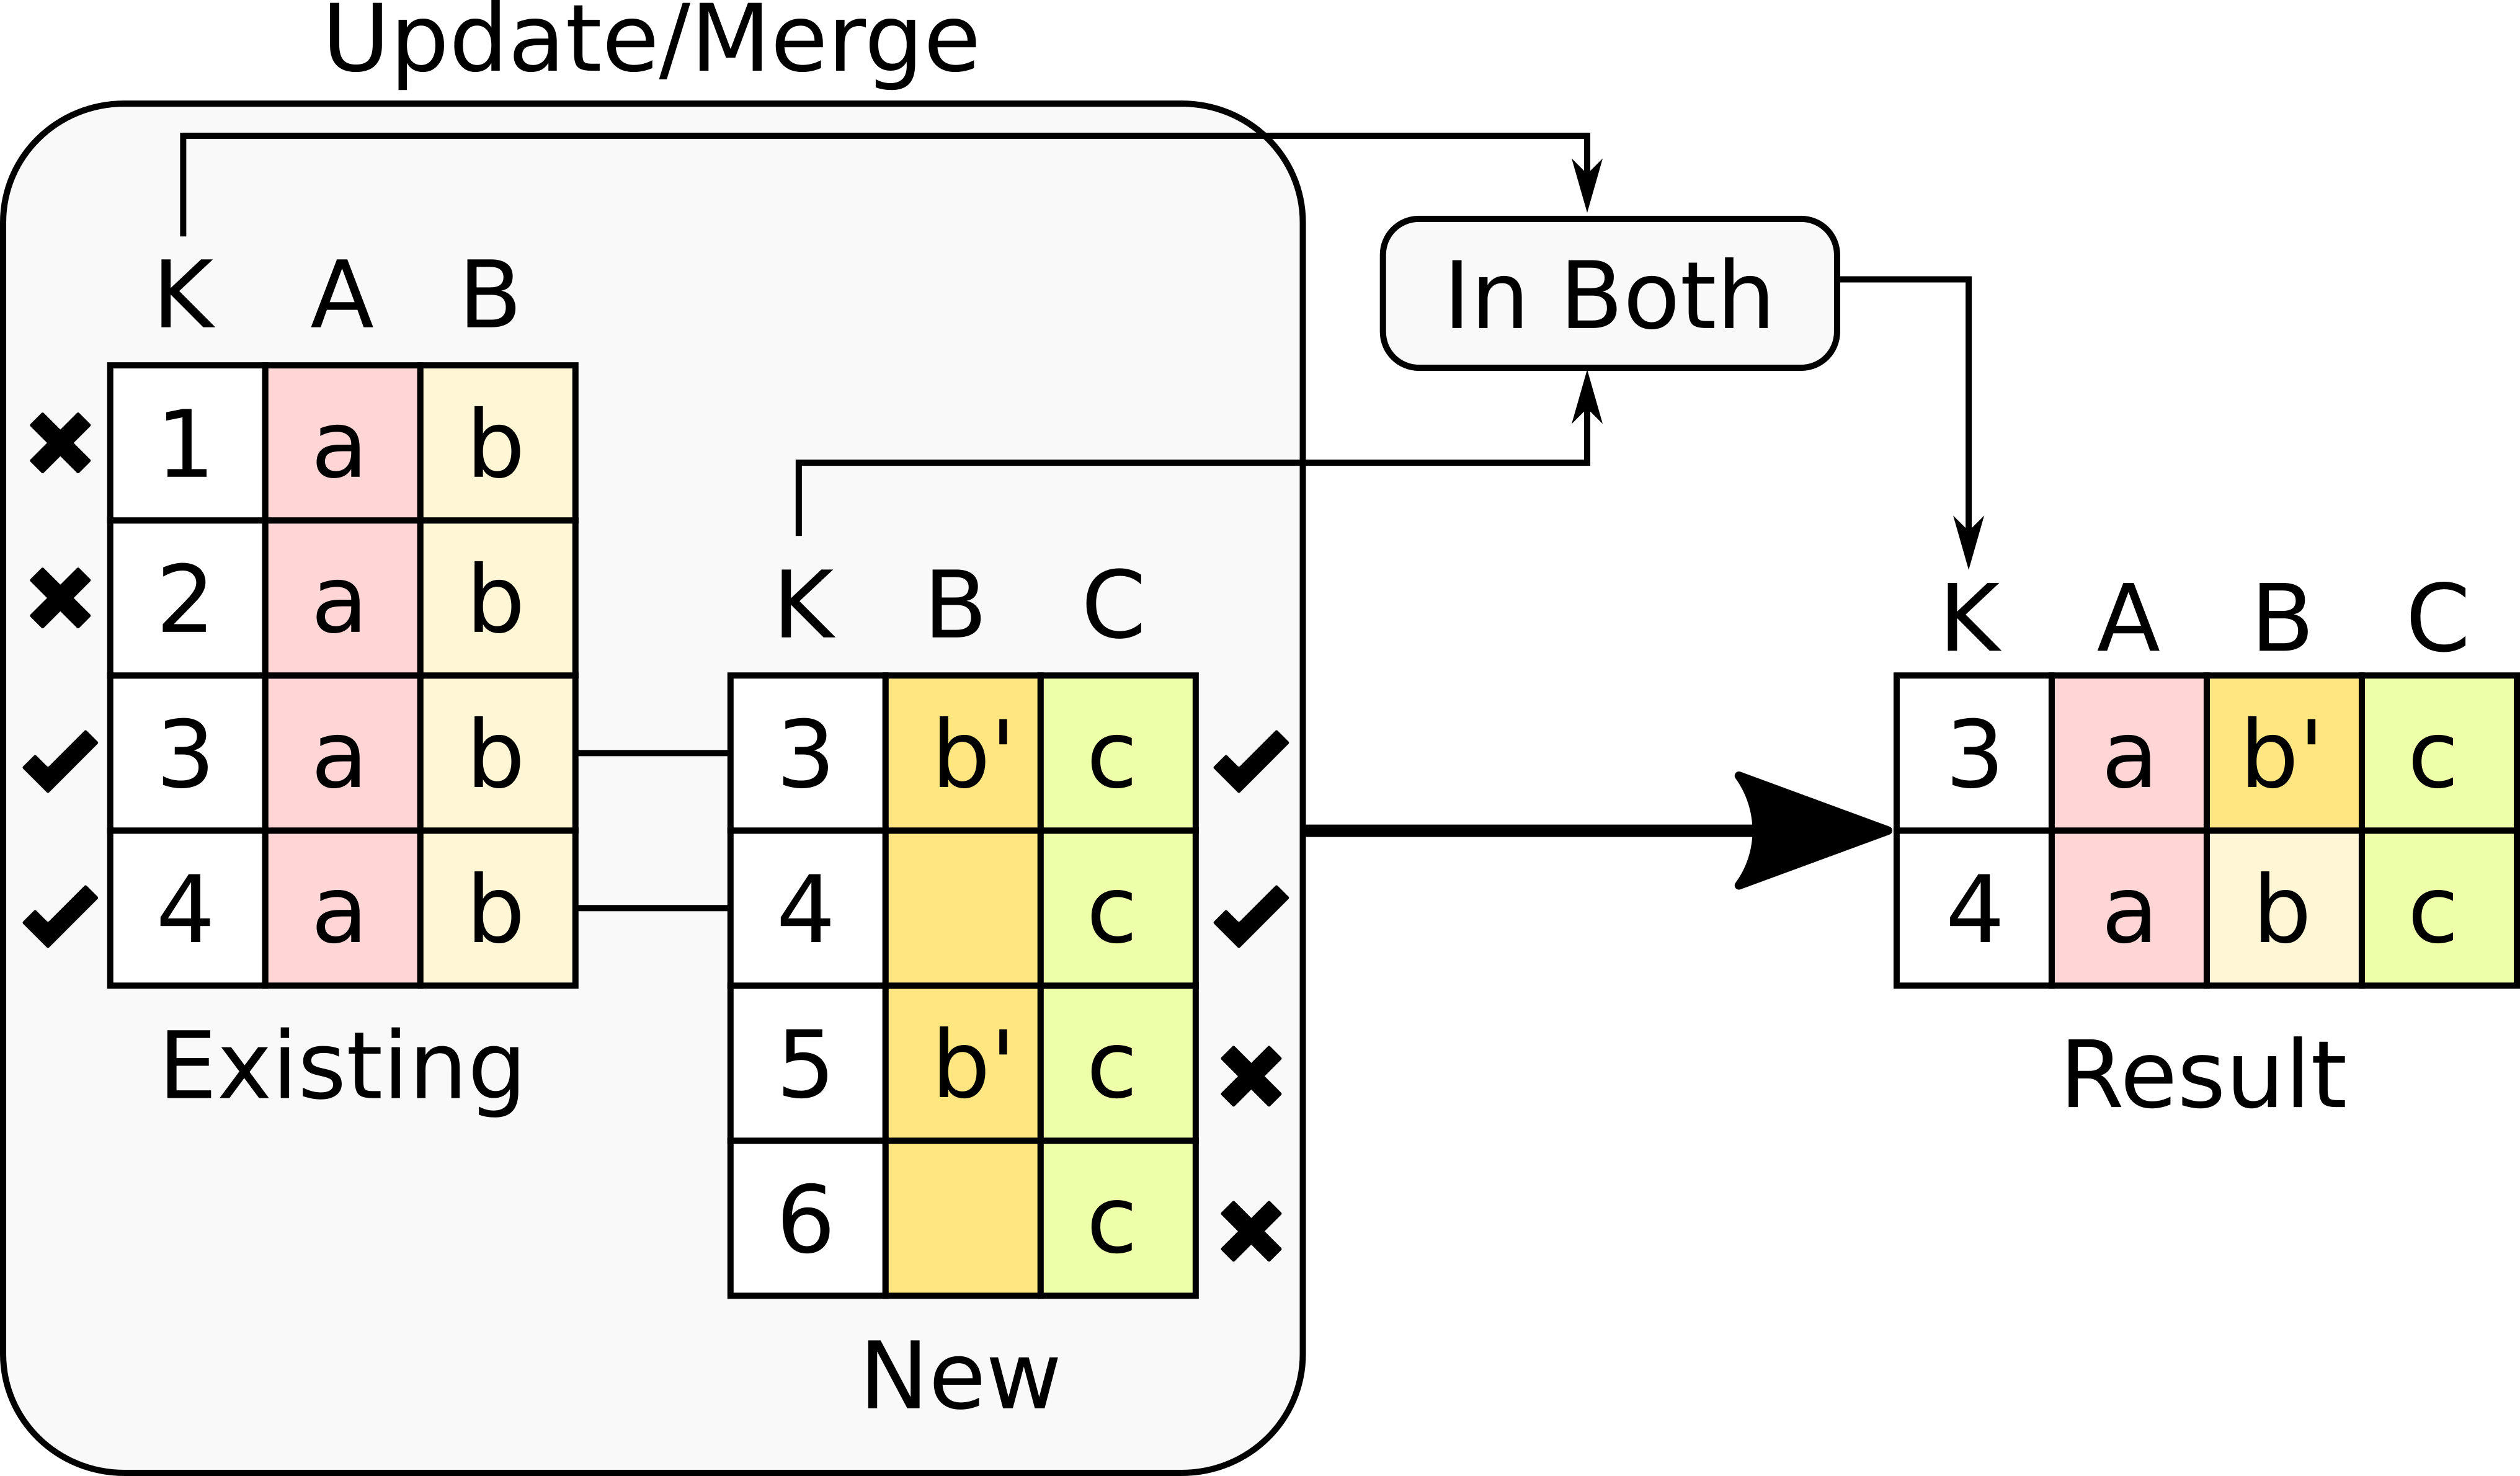
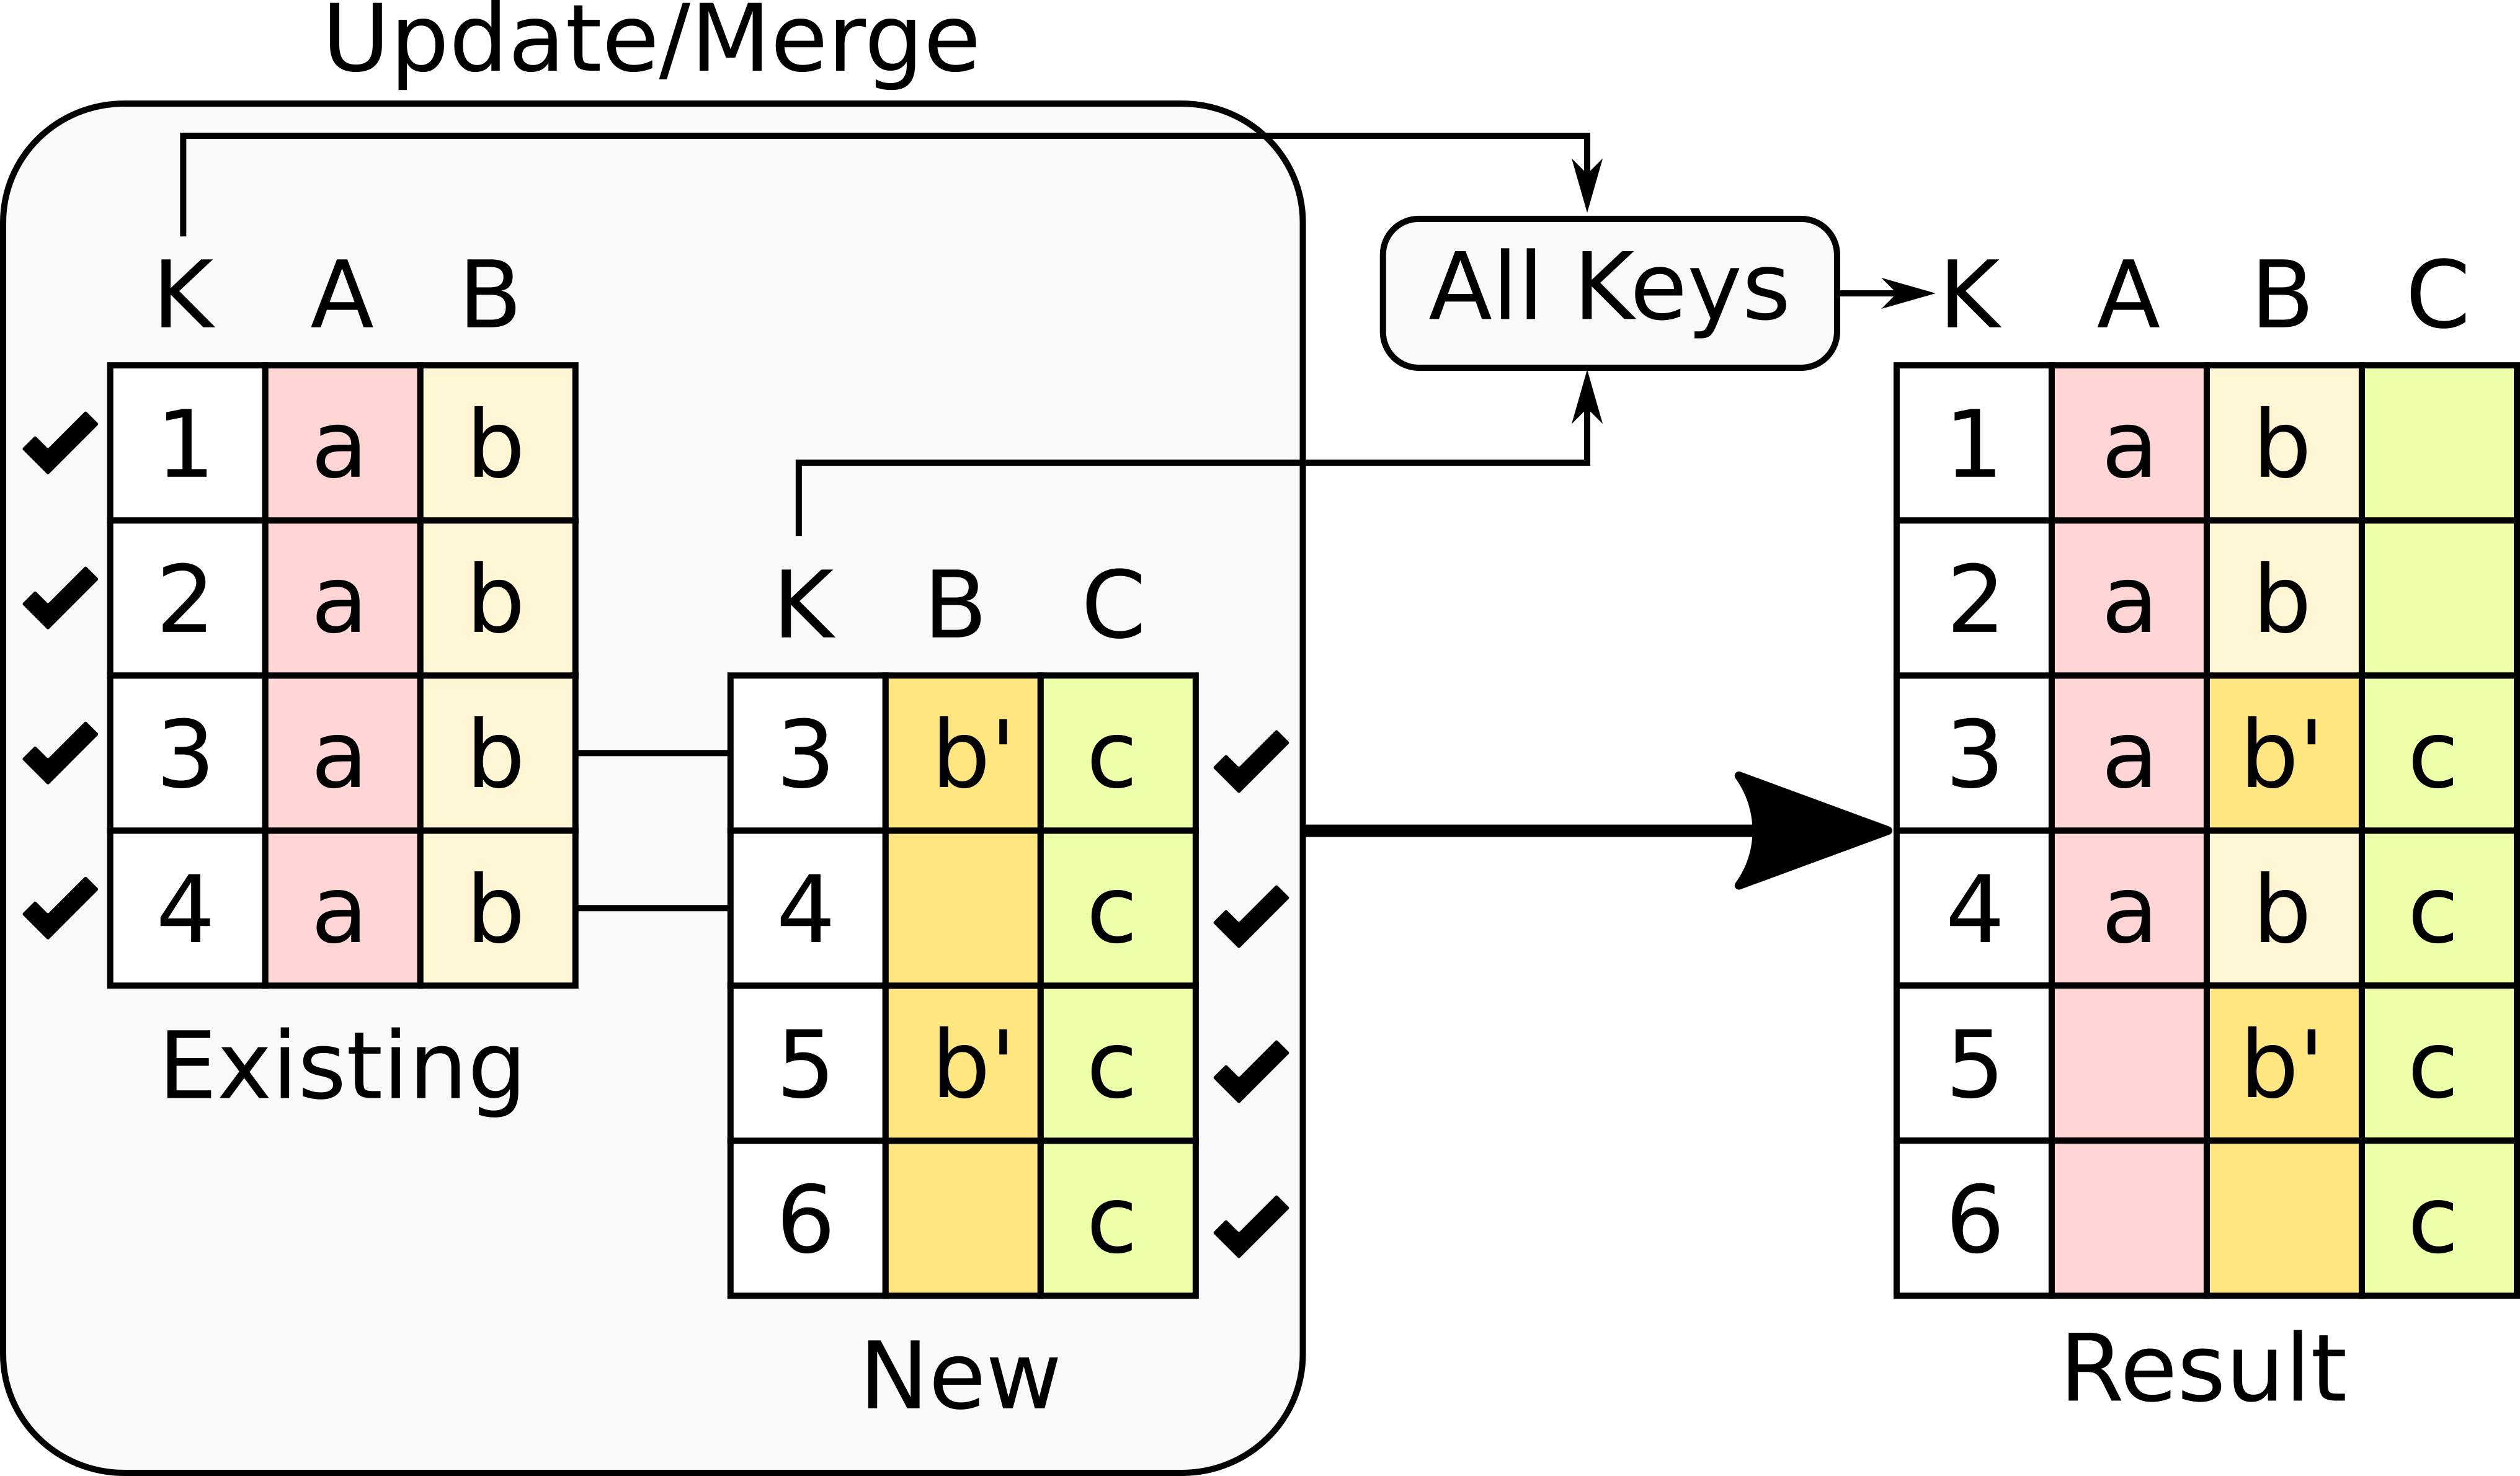
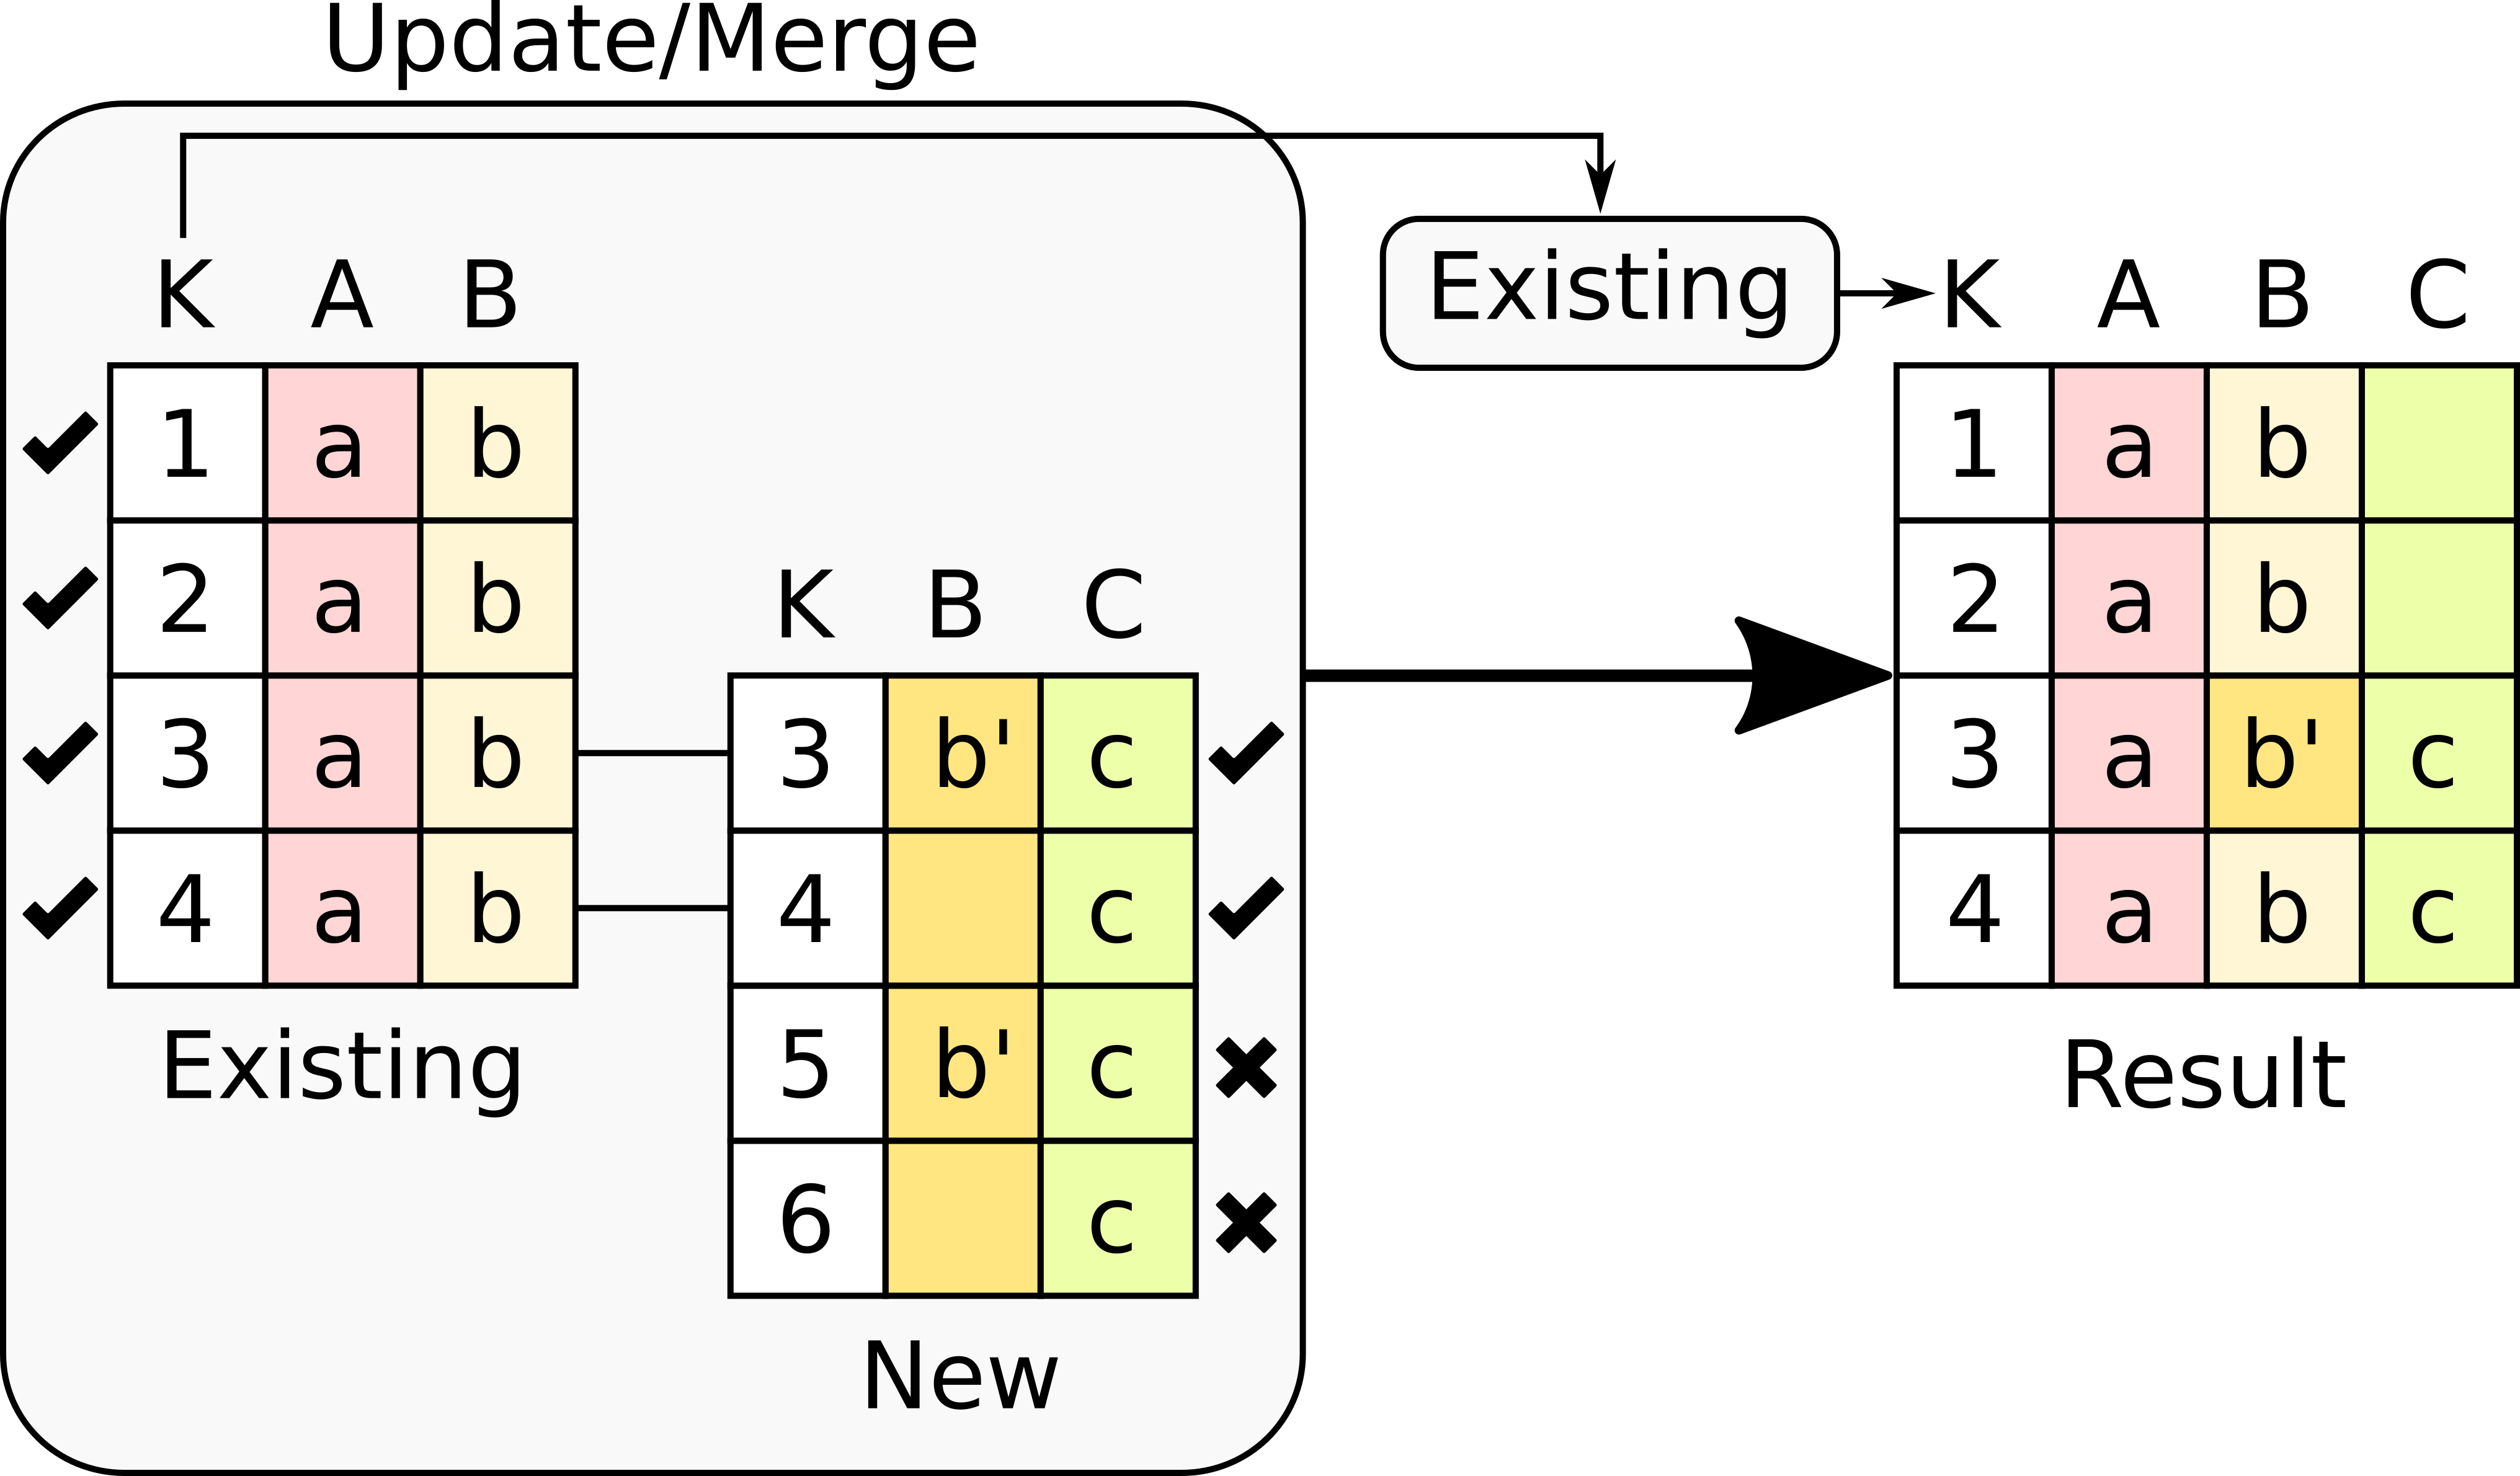
There are four possible merge variants:
-
Select only the rows with keys in both existing and new table . It will select only the rows for which values in both key columns are present. Or in other words, any row for which there is no value in either of the key columns will be dropped .
-
Select all rows in either the existing or new table .
All rows in both tables will be considered. You have to be careful with this option because it may produce columns that are no longer unique as a result.
-
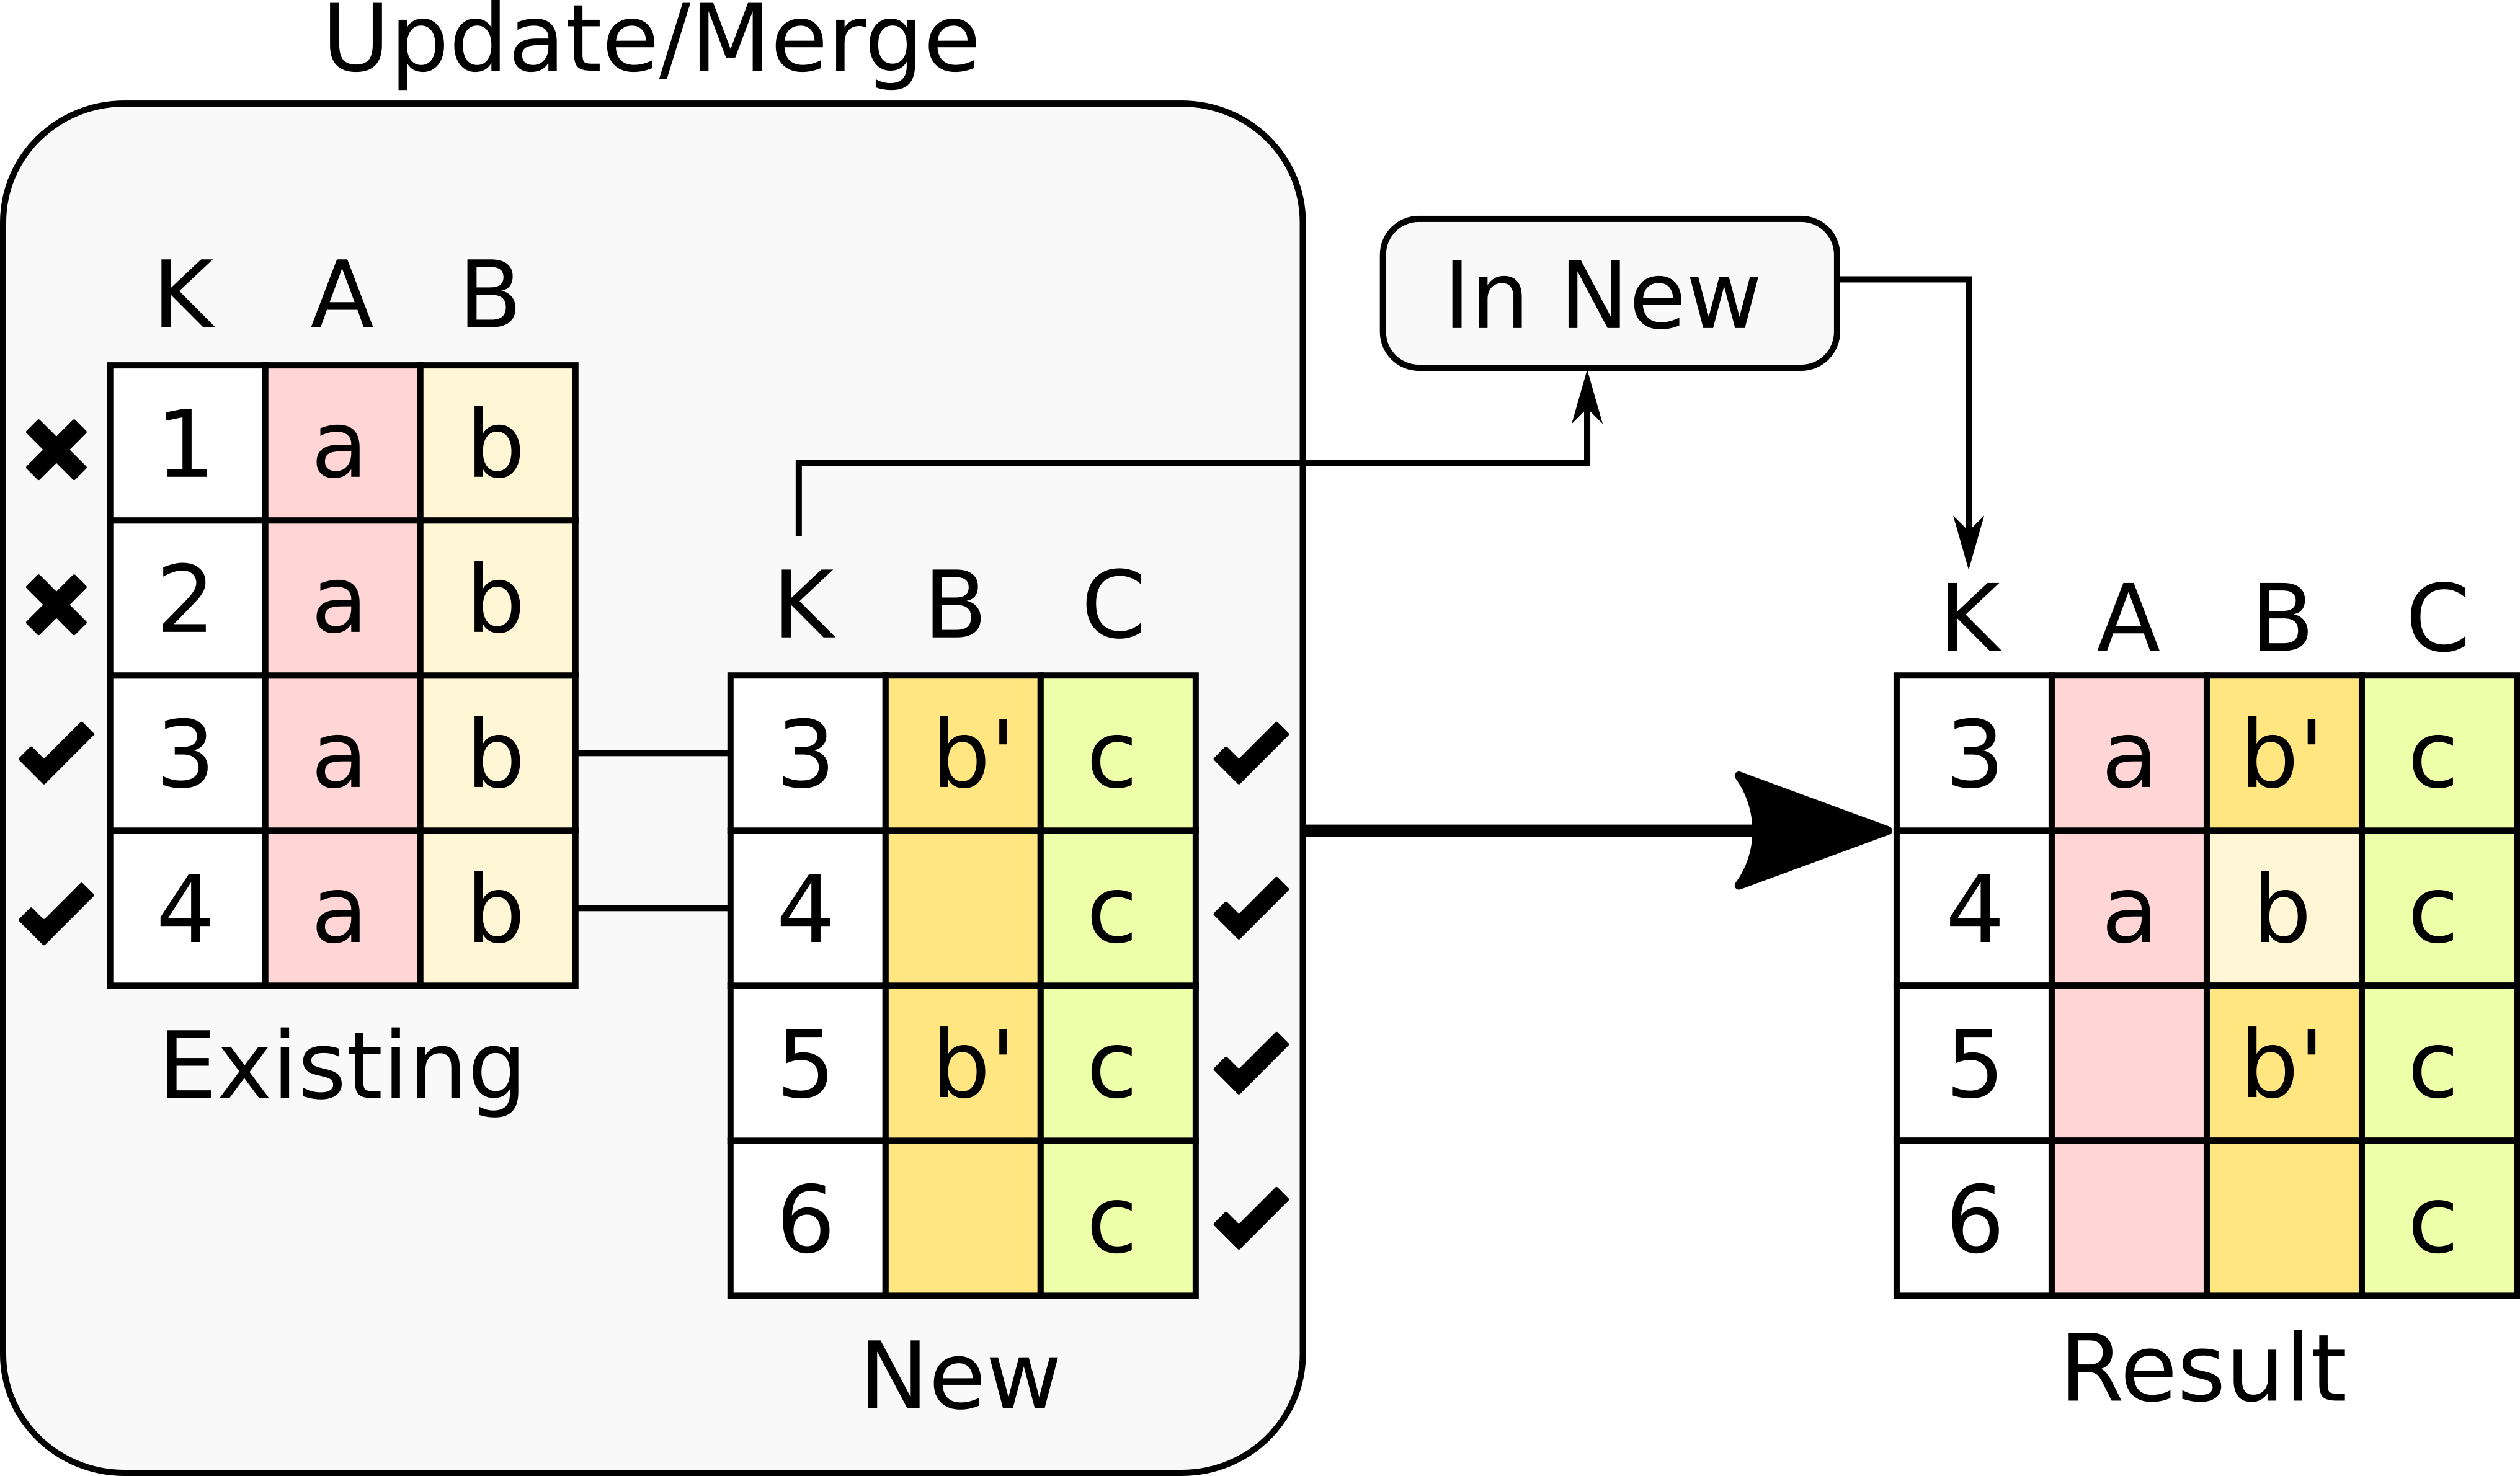
Select the rows with keys in the existing table .
Only the rows in the new table with a value in the key column that is present in the existing table will be considered, the rest will be dropped.
-
Select the rows with keys in the new table .
Only the rows in the existing table with a value in the key column that is present in the key column from the new table will be considered, the rest will be dropped.
In any of these variants, for those columns that are present in both the existing table and the new table, the values of the second will update the existing ones in the first. This update may introduce non-values in some of the rows (for example in columns for with the new data does not provide any value). Additionally, extra care needs to be taken when performing this operation as some of the merge variants may eliminate data in the existing table. In the extreme case, if you try to merge a table with a key column with no values in common with the existing key and you select the method that considers rows with keys in both the existing and new table, the result is an empty table.
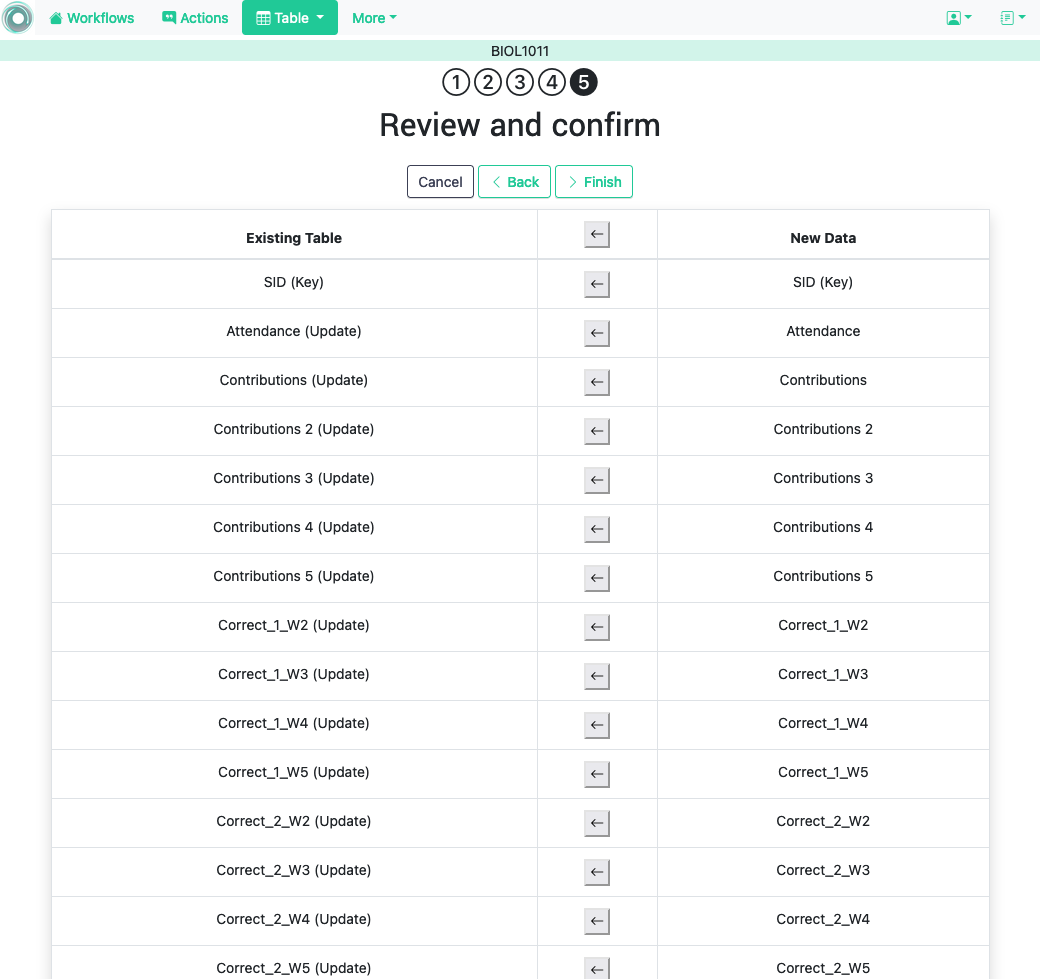
3.2.2.2. Step five: verify upcoming changes 
After selecting these parameters the last step is to review the effect of the operation and proceed with the merge as shown in the following figure.